Skip to content

Tooling

My Experience Preparing for the Azure Administrator Associate (AZ-104) Exam

There's been a bit of a lull the past couple of weeks on the blog as I've been focusing my time on studying and preparing for the AZ-104 exam. This was a particularly challenging certificate for me as I don't have a traditional IT Admin background so I had to not only shore up the gaps in that knowledge, but then also had to learn how to model similar concepts in Azure.

That being said, I was able to pass the exam on my first take and wanted to share some advice for those who are looking to take this or other Azure exams.

Expand your studying outside of the Microsoft Learn documentation

The Microsoft Learn docs are fine for doing a deep dive into a subject, but if it's the first time learning a concept, then they can be a bit rough as they assume you have knowledge that you might not. To help round out your learning, I recommend finding other resources like videos, books, or articles.

Build and Experiment in Azure

Given that most of these concepts are pretty abstract, I found that they stuck with me much more when I build out the resources. For example, when working with a Virtual Machine, all of its components need to be in the same region. You can either remember that text OR you know that has to be true because if you try building out the VM in Azure and try to change components, it's going to fail.

Don't Rely Solely on Practice Exams

Back in 2019, I was studying/preparing for the 483 (exam on C#) and the advice at the time was to go over the practice exams over and over again until things stuck. Following the same advice, I took tons of practice exams (through MS Learn and MeasureUp) and though they might have had the same format as the exam (multiple choice, drag-and-drop, etc...), none of them were a good stand-in for the real exam.

The reason being is that the exam questions likely won't ask you to define a term, but are more likely to be along the lines of how you'd solve a problem (which expects you to know the terminology inherently). So if you don't have the underlying knowledge, you're going to have a bad time trying to answer the questions.

Where the practice exams shone was helping me identify areas that I needed to focus more on. For example, if I struggled in the Networking section, then I know I needed to revisit concepts there. This helped me make the most of my studying time.

Using Generative AI To Help Understand Concepts

Given that I don't come from a networking/IT background, there were some concepts that were quite confusing to me. For example, I was trying to understand why I would need System routes if we already had Network Security Groups and Copilot was able to give me the following:

Asking Copilot why I would need system routes

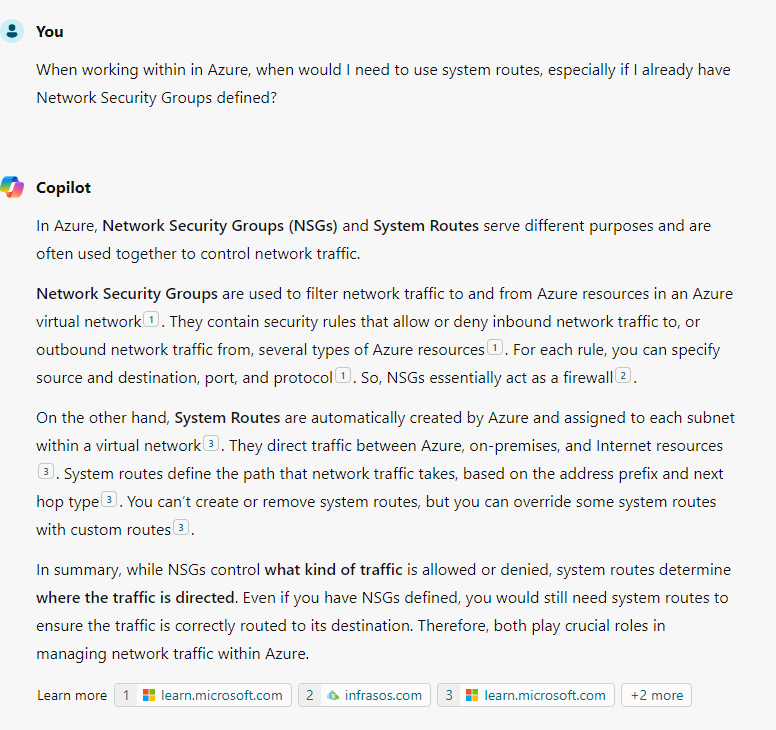
To help make sure I didn't fall victim to hallucinations, I followed up on the links that Copilot provided to make sure that I understood the concepts, but given that I learn best by asking questions, this was a major win for me since you can't ask questions to books/videos.

Resources That Helped Me

For those looking to study up on this exam, I had success using these resources. Note: I do not receive compensation for these recommendations.

Today I Learned - Using TypeSpec to Generate OpenAPI Specs

Recently, I was doing analysis for a project where we needed to build out a set of APIs for consumers to use. Even though I'm a big believer of iterative design, we wanted to have a solid idea of what the routes and data models were going to look like.

In the past, I most likely would have generated a .NET Web API project, created the controllers/models, finally leveraging NSwag to generate Swagger documentation for the api. Even though this approach works, it does take more time on the implementation side (spinning up controllers, configuring ASP.NET, creating the models, adding attributes). In addition, if the actual API isn't being written in with .NET, then this code becomes throwaway pretty quickly.

Since tooling is always evolving, I stumbled across another tool, TypeSpec. Heavily influenced by TypeScript, this allows you to write your contracts and models that, when compiled, produces an OpenAPI compliant spec.

As a bonus, it's not restricted to just API spec as it has support for generating JSON schemas and gRPC's Protocol Buffers (protobuf)

Getting Started

All code for this post can be found on my GitHub.

Given that it's inspired by TypeScript, the tooling requires having Node installed (at least 20, but I'd recommend the long-term-supported (LTS) version).

From there, we can install the TypeSpec tooling with.

npm install @typespec/compiler

Even though this is all the tooling that's required, I'd recommend installing an extension for either Visual Studio or Visual Studio Code so that you can get Intellisense and other visual cues while you're writing the code.

Bootstrapping the project

Now that we've got the tooling squared away, let's create our project.

1
2
3
mkdir bookstore-api # let's make a directory to hold everything
cd bookstore-api
tsp init --template rest

Enter a project name and choose the defaults. Once it's finished bootstrapping, you can install necessary dependencies using tsp install.

Building Our First API

For our bookstore application, let's say that we want to have an inventory route where someone can retrieve information about a book.

For this work, I'm picturing the following

# Route -> GET api/inventory/{id}
# Returns 200 or 404

In the project, locate the main.tsp file and add the following

1
2
3
4
5
6
7
8
9
using TypeSpec.Http;
using TypeSpec.Rest;

@service({
    title: "Bookstore Service"
})
namespace Bookstore {

}

After adding this code, run tsp compile . (note the period). This will create a file in the tsp-output/@typespec/openapi3 folder, openapi.yaml.

We can open that file and see what our OpenAPI spec looks like

1
2
3
4
5
6
7
openapi: 3.0.0
info:
  title: Bookstore Service
  version: 0.0.0
tags: []
paths: {}
components: {}

So far, not much to look at. However, if we copy this code and render feed it to an online render (like https://editor.swagger.io/), we'll get a message about no operations.

Swagger.io saying there are no operations

Let's change that by building out our GET endpoint.

Back in main.tsp, let's add more code to our Bookstore namespace.

1
2
3
4
5
6
7
namespace Bookstore {
    @tag("Inventory")
    @route("inventory")
    namespace Inventory {
        @get op getBook(@path bookId:string): string
    }
}

After running tsp compile ., we'll see that our yaml has been updated and if we render it again, we'll have our first endpoint

Swagger.io rendering inventory by ID route

This is closer to what we want, however, we know that we're returning back a string, but a Book.

For this exercise, we'll say that a Book has the following:

  • an id (of number)
  • a title (of string)
  • a price (of number, minimum 1)
  • author name (of string)

Let's add this model to main.tsp

namespace Bookstore {
    // Note that we've added this to the Bookstore namespace
    model Book {
        id: string;
        title: string;

        @minValue(1)
        price: decimal;

        authorName: string;
    }
    @tag("Inventory")
    @route("inventory")
    namespace Inventory {

        // For our get, we're now returning a Book, instead of a string.
        @get op getBook(@path bookId: string): Book; 
    }
} 

After another run of tsp compile and rendering the yaml file, we see that we have a schema for our get method now.

Swagger showing the updated model

Refactoring a Model

Even though this works, the Book model is a bit lazy as it has the authorName as a property instead of an Author model which would have name (and a bit more information). Let's update Book to have an Author property.

model Author {
    id: string;

    @minLength(1)
    surname: string;

    @minLength(1)
    givenName: string;
}
model Book {
    id: string;
    title: string;

    @minValue(1)
    price: decimal;

    author: Author;
}

After making this change, we can see that we now have a nested model for Book.

Swagger showing both Book and Author model

Handling Failures

We're definitely a step in the right direction, however, our API definition isn't quite done. Right now, it says that we'll always return a 200 status code.

I don't know about you, but our bookstore isn't good enough to generate books with fictitious IDs, so we need to update our contract to say that it can also return 404s.

Back in main.tsp, we're going to change our return type of the @get operation to instead of being a Book, it's actually a union type.

1
2
3
4
5
6
7
8
@get op getBook(@path bookId: string): 
// Either it returns a 200 with a body of Book
{
    @statusCode statusCode: 200;
    @body book: Book;
} | { // Or it will return a 404 with an empty body
    @statusCode statusCode: 404;
};

With this final change, we can compile and render the yaml and see that route can return a 404 as well.

Swagger showing that the route can return a 404 as well

Next Steps

When I first started with TypeSpec, my first thought was that you could put this code under continuous integration (CI) and have it produce the OpenAPI format as an artifact for other teams to pull in and auto-generate clients from.

If you're interested in learning more about that approach, drop me a line at the Coaching Corner and I may write up my results in a future post.

Today I Learned - Effective Pairing with Mob.sh

As someone who enjoys leveraging technology and teaching, I'm always interested in ways to simplify the teaching process.

For example, when I'm teaching someone a new skill, I follow the "show one, do one, lead one" approach and my tool of choice for the longest time was LiveShare by Microsoft.

Using VS LiveShare

I think this extension is pretty slick as it allows you to have multiple collaborators, the latency is quite low, and it's built into both Visual Studio Code (VS Code) and Visual Studio.

Drawbacks to LiveShare

Editor Lock-In

First, participants have to be using Visual Studio or VS Code. Since there's support for VS Code, this isn't quite a blocker as it could be. However, let's say that I'm wanting to work with a team on a Java application. They're more likely to be using IntelliJ or Eclipse as their editor and I don't want someone to have to change their editor just to collaborate.

Security Concerns

Second, there are some security considerations to be aware of.

Given the nature of LiveShare, collaborators either connect to your machine (peer-to-peer) or they go through a relay in Azure. Companies that are sensitive to where traffic is routed to won't allow the Azure relay option and given the issues with the URL creation (see next section), the peer-to-peer connection isn't much better.

To start a session, LiveShare generates a URL that the owner would share with their collaborators. As of today, there's no way to limit who can access that link. The owner has some moderator tools to block people, but there's not a way to stop anyone from joining who doesn't have the right kind of email address for example.

Introducing Mob.sh

While pairing with a colleague, he introduced me to an alternative tool, mob.sh

At first, I was a bit skeptical of this tooling as I enjoyed the ease of use that I got with LiveShare. However, after a few sessions, I find that this tool solves the problems that I was using LiveShare for just as good, if not better.

How It Works

At a high level, mob.sh is a command line tool that is a wrapper around basic git commands.

Because of this design choice, it doesn't matter what editor that a participant has, as long as the code under question is under git source control, the tooling works.

Let's explore how a pair, Adam and Brittany, would use this tool for work.

Adam and Brittany Start Pairing

Adam is looking to solve a logic issue in an AWS lambda could use Brittany's guidance since he's new to that domain.

Adam creates a new feature branch, fixing-logic-issue and starts a new mobbing session.

1
2
3
git switch -c fixing-logic-issue
mob start --create
# --create is needed because fixing-logic issue is not on the server yet

Under the hood, mob.sh has created a new branch off of fixing-logic-issue called mob/fixing-logic-issue. While Adam is making changes, they're going to occur on the mob/fixing-logic-issue.

Because the pair is working remotely, Adam shares his screen so that they're on the same page.

While on this branch, Adam writes a failing unit test that exposes the logic issue that he's running into. From here he signals that Brittany is up by running mob next

mob next

By running this command, mob.sh adds and commits all the changes made on this branch and pushes them up to the server. Once this command completes, it's Brittany's turn to lead.

Once Brittany see's the mob next command complete, she checks out the fixing-logic-issue branch and picks up the next portion of the work by running mob start

1
2
3
git pull # To get fixing-logic-issue branch
git switch fixing-logic-issue
mob start

Because she was on the fixing-logic-issue branch, mob.sh was able to see that there was a mob/fixing-logic-issue branch already, so that branch is checked out.

Based on the test, Brittany shows Adam where the failure is occurring and they write up a fix that passes the failing test.

Though there are more changes to be done, Brittany has a meeting to attend, so she ends the session by running mob done, committing, and then pushing the changes.

1
2
3
mob done
git commit -m "Fixed first logic bug"
git push

By running mob done command, all the changes that were on the mob/fixing-logic-issue are applied to the fixing-logic-issue branch. From here, Brittany can commit the changes and push them back to the server.

Wrapping Up

If you're looking to expand your pairing/mobbing toolkit, I recommend giving mob.sh a try. Not only is the initial investment small, but I find the tooling natural to pick up after a few tries and since it's a wrapper around Git, it reduces the amount of learning needed before getting started.