Welcome to the tenth installment of Learning Through Example – Mars Rover! At this point, we’ve wrapped up all the functionality for the Rover, so now it’s time to start implementing the logging requirements. Like always, we’ll first take at the requirements to ensure we’ve got a good idea of what’s needed. From there, we’ll talk about the different approaches for implementation we could take. Finally, we’ll decide on a rough approach for implementation
If we look back at the original requirements for logging, we find the following
In order to help troubleshoot failures with the emulation, every time a command is received, both the command received, the rover’s location, and the rover’s orientation should be logged.
Yep, these requirements are clearly defined, but what’s the problem we’re trying to solve? Why do we care if this happens or not? After talking more with the Subject Matter Expert (SME), it seems like there are two main reasons for the logging requirement. First, they want a way to troubleshoot if something goes wrong in the emulation, and having this trace will be helpful in reproducing the error. Second, they want to have different runs be separated in the logging in the event they need to troubleshoot a specific run.
Given the above intent, it sounds like an easy approach we can take is to log all of this information to a file with a specific name. In real production code, you would likely use a logging solution instead of implementing your own, but this will provide a good opportunity to learn some of the System.IO namespace in .NET.
With a rough implementation in mind, we have another discussion with our SME, and come up with the following requirements:
When the application starts, the user will need to specify where to log the information to (known as the path)
If the path doesn’t exist, the user is informed of such and the application doesn’t continue
If the path isn’t accessible (maybe due to a permissions issue), then the user is informed of such and the application doesn’t continue
If the path is valid, then a text file will be created that contains the information generated by the emulator
Every time the Rover receives a command, its Location and Orientation should be logged
Now that we have requirements, how do we want to begin implementation? Do we want to add this logic to the Rover class? Or should we add a new component to handle logging?
So one approach to this problem is to widen the responsibilities for the Rover, add a Log method and update the existing methods to use this new method. The advantage of this approach is that the logging is in one place so it’s easy to make changes. Another advantage is that since the Rover component already exists, we can go ahead and add some new tests pretty quick.
Unfortunately, this approach has two major downsides. First, by widening the responsibilities, we’ll need to update all existing tests to deal with logging (which may not be a trivial change to make). Second, since the Rover handles the logging, we’ve muddled our easy-to-test business rules with a cross-cutting concern and now the Rover would have a couple of different reasons to change. Bummer 🙁
The advantage of writing a new component is that we can focus on making a Logger component that just knows how to log any message to storage, regardless of what uses this component. By taking this approach, we can have a “dumb” component (almost not worth testing) and keep the things that we care about (i.e. the business rules) easier to test.
The main downside of this approach is that we have yet another component to manage. In our particular case, that’s alright, but as the codebase becomes larger, this is something to keep in mind.
With our rough approach in mind (creating a new component to handle logging), let’s take a look at what this new component is going to need to work as expected. Based on the requirements, the Logger will need to know where to log the information to (the path) and what to log (the message). These necessary pieces of information are known as dependencies because the Logger won’t work if these are not provided.
When it comes to injecting in a dependency, there are three main approaches, each providing benefits and drawbacks. Let’s take a closer look at these approaches.
First and foremost, constructor injection makes a lot of sense if the dependency doesn’t change throughout the lifetime of the object. Let’s say that we have an object that knows how to retrieve records from a database. As part of its work, it will need access to a connection string to connect to the database in question.
publicclassItemRepository{privatereadonlystring_connectionString;// By adding the dependency here, there's no way you that// an ItemRepository could be created without specifying// a connection string.publicItemRepository(stringconnectionString){_connectionString=connectionString;}}// Example usage// If the connectionString isn't provided, then// the code doesn't compile!varitemRepository=newItemRepository("Data Source=localhost;Initial Catalog=AdventureWorks;Integrated Security=True")
Generally speaking, an application doesn’t speak to multiple databases, so the odds of the connection string needing to change during the lifetime of this class is slim. Given that, it makes sense to inject this dependency at the constructor level.
One of the benefits of injecting dependencies at the constructor level is that you’re revealing your intent to other developers. In this case, you’re signaling others “Hey, if you’re going to use this class, you need to specify a connection string, otherwise this isn’t going to work!”
The main downside of this approach is that by adding more parameters to the constructor, you may end up with classes that have a ton of dependencies. However, if you find yourself in that situation, you might have another problem going on.
For this approach, method injection makes sense if the dependency can change during the lifetime of the object. Let’s say that we have a component that needs a way to send notifications and that the notification mechanism is based on user preferences. For example, if I’m making a purchase, then I want the order confirmation to be emailed to me whereas other customers might want their receipt texted to them.
publicclassPurchaseWorkflow{// By adding the NotificationStrategy here,// there's no way that a developer can call // the Complete method without specifying // a way to notify the customer.publicvoidComplete(Orderorder,INotificationStrategystrategy){stringreceiptDetails=CreateReceipt(order);strategy.SendNotification(order.Customer,receiptDetails);}}// Example Usagevarorder=newOrder("Cameron",22.50);varworkflow=newPurchaseWorkflow();// If a NotificationStrategy isn't passed in, this code won't compile.workflow.Complete(order,newTextNotificationStrategy());
If we were to use constructor injection, that means that we would need to instantiate a whole new object just because the notification mechanism needed to change which seems a bit excessive for our use case.
Otherwise, method injection has the same main advantage of constructor injection (i.e. revealing design intent) and disadvantage (can lead to a bunch of necessary parameters to pass in)
Unlike the other two approaches, property injection allows us to set the dependency as a property on the object and then start using the object. Unlike the other two approaches where you have to always specify the dependency, this approach allows you to set the dependency, use the class, then switch out the dependency without having to create a new instance (like constructor injection would force you to) and without having to specify it every time a method was called.
However, the main downside is that you as the developer need to remember to set this property otherwise the code will compile, but you’ll run into a runtime exception. It’s because of this limitation that I’ll avoid this injection technique and stick with either constructor or method level injections.
publicclassPurchaseWorkflow{// By having the notification be set as a property, // developer can set this dependency once and then// only change it when needed.// However, there's nothing forcing a developer to // set this property.publicINotificationStrategyNotificationStrategy{get;set;}publicvoidComplete(Orderorder){stringreceiptDetails=CreateReceipt(order);NotificationStrategy.SendNotification(order.Customer,receiptDetails);}}// The Mistakevarorder=newOrder("Cameron",22.50);varworkflow=newPurchaseWorkflow();workflow.Complete(order);// This will cause a NullReferenceException to be thrown// Proper Usagevarorder=newOrder("Cameron",22.50);varworkflow=newPurchaseWorkflow();// As long as you remember to set this property, things should work!workflow.NotificationStrategy=newTextNotificationStrategy();workflow.Complete(order);
Now that we’ve looked at the various ways we can inject dependencies, we can start coming up with the rough design for Logger. Looking back at the requirements, we have two dependencies to worry about (the path and the message to log).
Given that the path is not going to change during a run of the emulator, we should leverage constructor injection for this dependency. For the message, since that will be based on the Rover's Location and Orientation which will change during the emulation, we should leverage method injection for this dependency.
With all of this in place, we now have a much clearer idea of how the Logger component is going to look!
In this post, we explored the requirements for logging and why the logging logic should be a separate component due it being a cross-cutting concern. From there, we explored at the three main ways to inject dependencies (constructor, method, and property). With this knowledge, we were able to make some smart decisions on how to inject where to log the information and what to log. In the next pose, we’ll build upon this design by creating the Logger component. From there, we were able to make decisions on how to inject the path of where to log and the message to log. In the next post, we’ll start implementing the logic for creating the Logger component.
Welcome to the ninth installment of Learning Through Example – Mars Rover! In this post, we’re going to start driving out the functionality for the Rover and the business rules for turning right! First, we’ll take a look at the requirements to make sure we have an idea of what’s needed. From there, we’ll start implementing the requirements. By the end of this post, we’ll have a Rover that can do perform all of the commands!
If we look back at the original requirements for turning right, we find this single line as the requirement
When the rover is told to turn right, it will rotate 90 degrees to the right, but not change its location
Given this requirement, we’re able to double-check with our Subject Matter Expert that the Rover is essentially rotating in place which yields the following requirements.
Given the Rover is facing North, when it turns right, then the Rover should be facing East at the same Coordinate
Given the Rover is facing East, when it turns right, then the Rover should be facing South at the same Coordinate
Given the Rover is facing South, when it turns right, then the Rover should be facing West at the same Coordinate
Given the Rover is facing West, when it turns right, then the Rover should be facing North at the same Coordinate
So far, the requirements are very similar to when we were implementing TurnLeft, so let’s see if we can leverage the same setup!
Given what we learned when we were implementing the rules for TurnLeft, I’m going to go ahead and copy the test and add the single case for when Rover faces North
Since TurnRight doesn’t exist, this test will fail so let’s go ahead and write enough code to make it pass. For the implementation, I’m going to go ahead and take advantage of the pattern that we found last time, yielding the following
One thing to note is to take a look at how we defined ifSouth, ifEast, and ifWest. Since we’re still wanting to implement one requirement at a time, I’ve defined them to do nothing so that if Execute is called, nothing will happen. Alternatively, I could have defined them to throw an exception, but I believe that’s a bit much since we’ll be implementing the functionality soon!
With that implementation, our test passes, so it’s time to go on to the next requirement!
Goodness, that was a pretty quick implementation of TurnRight! Thanks to our previous refactoring in Rover and leveraging parameterized testing, we were able to implement this new feature with a minimal amount of code and the code we did write was focused on the new functionality, not boilerplate.
With that being said, here’s our final version of Rover!
With the completion of TurnRight, the Rover has finally been implemented with all required pieces of functionality. Through this process, we learned how to write good unit tests, how to refactor unit tests to use parameterized unit testing, and reducing repetition through a SOLID refactor of if/else all of which culminating in TurnRight being a simple piece of functionality to include. In the next post, we will start working on implementing our logger!
Welcome to the eighth installment of Learning Through Example – Mars Rover! In this post, we’re going to examine the Rover class and see what refactoring we can do based on some patterns we’re seeing with MoveForward, MoveBackward, and TurnLeft. After looking at the characteristics, we’ll explore a couple of different approaches with their pros and cons. Finally, we’ll make the refactor, using our test suite to make sure we didn’t regress in functionality.
If we look at the definition for Rover, it becomes clear that we have some major code duplication going on with regards to its MoveForward, MoveBackward, and TurnLeft methods.
Based on the implementations, it seems like knowing what Direction the Rover is facing is a key rule to determine what update the Rover needs to do. The big pain point with this block of statements is that if we added a new Direction (like NorthEast), then we’d have to update these statements in multiple places even though all of these instances are referring to the same concept (i.e is the Rover facing this Direction). The other, more nuanced issue is that if we added a new Direction, there’s nothing forcing us to update all of these places because of our use of if/else.
From what we’re seeing, the primary issue are the duplicated if/else statements, so one of our primary design goals should be to have that logic in one place (instead of three different places). From there, we’d also like to have a way for the compiler to force us to handle the different Directions that the Rover is facing.
We’ve now got the if/else isolated, but there are some questions on what the return type of this method should be or what parameters it will take. In order to answer those questions, let’s take a look at a couple of different approaches.
Now that we have a method that can operate given the Rover's Orientation, one approach we could do is to modify this method to take in an Action for every possible Orientation. Then based on the Orientation, the appropriate Action is called.
The primary advantage of this approach is that in order to call Execute, you have to pass a parameter for the different directions. If you fail to do so, the code will fail to compile, which forces developers to handle the various use cases.
Furthermore, if there’s a bug in any of the Actions, then for troubleshooting, we’d need to know what method caused the problem and what the rover’s Orientation was and we can quickly figure out what the problem is.
When using this approach, one thing to keep in mind is if we need to support additional Directions in the future. The Execute method is already taking in four parameters and keeping them in the right order is difficult enough. What about five, six, or ten directions to support? The function signature would quickly become unwieldy.
In addition, the other downside to this approach is that if any of the Actions were to become much more complicated, it would start cluttering up the respective Move or Turn methods.
Now that we have a method that can operate given the Rover‘s Orientation, another approach is to introduce the Strategy pattern where we would need to create the following types
IMovementStrategy – an interface that lists the different kinds of movements that can be done (currently MoveForward, MoveBackward, and TurnLeft)
NorthMovementStrategy – a new class that implements the IMovementStrategy and is responsible for the various business rules when moving and facing North
GetMovementStrategy – a method in Rover that for the current Orientation, returns the right implementation of IMovementStrategy
Update the existing move methods to use GetMovementStrategy
First, let’s take a look at the IMovementStrategy definition
The key takeaway for this type is that if we need to add an additional movement (like TurnRight), we’ll need to update this interface. Taking a closer look, we’ve defined the signatures for all of the methods to return a value (either a Location or a Direction). We have to make this change because no Strategy will have access to the Rover itself, so it’ll need to return the correct value for Rover to hold onto.
Next, let’s take a look at an example implementation for when the Orientation is North
If you look closer, we’ve essentially moved the business rules for the three methods from the existing business rules. We would repeat this process for the other Directions (yielding a SouthMovementStrategy, an EastMovementStrategy, and a WestMovementStrategy)
Now that we have the various strategies in place, we can create the GetMovementStrategy method
When using this approach, we can easily extend functionality when new Directions are added. For example, if we added NorthEast, then we would create a new MovementStrategy, have it implement the interface and fill in business rules (also allowing us to easily add tests as we go). From there, we would update the GetMovementStrategy method to return the new strategy. By adding new functionality by primarily writing new code and making very little modifications to existing code, we can adhere to the Open/Closed Principle from SOLID design.
The major drawback of this approach is that we had to create a lot of boilerplate code to make everything hang. One interface, four implementations, and a factory method for creating the appropriate strategy for a given Orientation.
The other, more subtle, drawback is that one must be aware of the pivot point of change. For example, we originally made this refactor based on strategies of what to do when faced in a given Direction. This made sense as an easy refactor. However, we’ve now made it easy to support a new Direction when added, but if we were to add a new Command instead, we would update the IMovementStrategy with the new method which would break all implementations. Once that happens, we have no choice but to implement the whole feature at once.
Personally, I’m a proponent of delivering value in small chunks and verify that we’re building the right thing, but in this case, this approach doesn’t make that easy.
Given the above options, I’m going to choose the more functional approach mostly because the business rules in my case are one-liners. If they were more complex, then I’d lean heavily more towards the Strategy pattern.
With that in mind, I’m going to go ahead and define the general Execute method as such
Now that I’ve updated TurnLeft, I can run the tests to make sure I didn’t break functionality. This is where the power of automated tests come to play. I can have higher confidence that my refactor didn’t break anything because of the test suite.
After verifying that the tests pass for TurnLeft, I’ll continue refactoring MoveForward
So at this point, we’ve successfully refactored MoveForward, MoveBackward, and TurnLeft to use Execute instead of their own logic, but the more I look at Execute, the more I want to convert the if/else into a switch statement because a switch is going to force us to implement the different Directions whereas the if/else pattern did not. So let’s go ahead and make that change.
At this point, we’ve made some good changes to the Rover with how the various methods work by examining the duplication (the if/else), extracting the duplication to a single area, and the compared the functional approach and the OOP approach via the Strategy pattern. In the next post, we’ll take on implementing TurnRight and see how our new refactor works in practice when adding new functionality!
Welcome to the seventh installment of Learning Through Example – Mars Rover! In this post, we’re going to start driving out the functionality for the Rover and the business rules for turning left! First, we’ll take a look at the requirements to make sure we have an idea of what’s needed. From there, we’ll start implementing the requirements. By the end of this post, we’ll have a Rover that can do 3/4 of the possible commands!
If we look back at the original requirements for turning left, we find this single line as the requirement
When the rover is told to turn left, it will rotate 90 degrees to the left, but not change its location
Given this requirement, we’re able to double check with our Subject Matter Expert that the Rover is essentially rotating in place which yields the following requirements.
Given the Rover is facing North, when it turns left, then the Rover should be facing West at the same Coordinate
Given the Rover is facing West, when it turns left, then the Rover should be facing South at the same Coordinate
Given the Rover is facing South, when it turns left, then the Rover should be facing East at the same Coordinate
Given the Rover is facing East, when it turns left, then the Rover should be facing North at the same Coordinate
Even though we’ve not written tests that have this exact setup, it looks like we should be able to use that as a start while we’re implementing. So let’s go ahead tackle the first requirement!
Not too bad of a setup! First, we create the Rover and capture its initialLocation. From there, we call our new method, TurnLeft which doesn’t exist yet, but will soon. After TurnLeft has been called, we check to make sure that our Location is the same and that our Orientation has been updated accordingly.
Pretty straightforward implementation and is good enough to make the test pass. Not much to refactor at this point so let’s go ahead and work on the next test case.
Once again, now that we have passing tests, is there anything we want to refactor? The business rules look to be simple enough so I don’t feel the need to refactor those. When we look at the test code, the test seems straightforward and I’m not sure what I’d simplify.
Time to commit these changes and on to the next requirement.
With everything passing again, we can pause to rethink about refactoring but so far so good from my perspective. There are maybe some superficial changes that could be made, but I can’t make a strong enough argument to implement them.
When I find myself writing tests where the tests look exactly the same and the only difference is the initial data and expected output, then I start thinking about how to parameterize the test so that the test is run multiple times, but with different parameters. By making this change, we reduce the amount of test code written, without sacrificing readability or maintainability.
It seems like it would be easy to write tests in this fashion, so why don’t we use this technique all the time?
The primary reason why we wouldn’t want to use this approach is if we would need to pass in a ton of parameters in order to make this test generic enough. A general guideline I use is that if the total parameters are three or less, then parameterization is a good fit. However, if I find out that I need to pass in more than three parameters, it makes me wonder if the tests are really the same test at all.
A secondary reason why this approach may not be a good fit is if it clouds our readability and debug-ability of the tests. Recall that our tests help us drive out our requirements and helps us talk in a ubiquitous language. If we can no longer do that easily, then we should not parameterize our tests.
If we examine a bit closer, we’ll notice that the only differences are the starting Orientation and the expected Orientation. Since those are the only values that we would need to parameterize, this is a great candidate for parameterization!
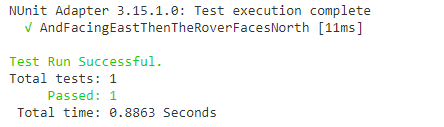
So starting off slow, we’re going to refactor the AndFacingEastThenTheRoverFacesNorth test to use NUnit’s TestCase attribute to pass in the parameters. Even though we’re using NUnit for this functionality, most test frameworks support this concept, just with different syntax.
With these changes in place, let’s break down what our approach was.
First, we added the TestCase attribute to the test as this allows us to specify parameters. In this case, we’re passing in two parameters (Direction.East and Direction.North). In addition, we’re also giving this TestCase a unique test name by setting the TestName property to AndFacingEastThenTheRoverFacesNorth. By setting this property, we’re controlling what this test will show up in the test runner.
Second, we changed the signature of the test method to take in two Directions, one for the start and the other for the expected direction for Rover. These new parameters line up with the ordering of parameters in the TestCase. In addition, since this test is going to be a bit more generic, I renamed this method to RoverTurningLeft because the TestName is going to have my requirement and this method is the generic shell.
Finally, we updated how we initialized the Rover by setting it’s Orientation to be start and we changed our Assert to be on expected.
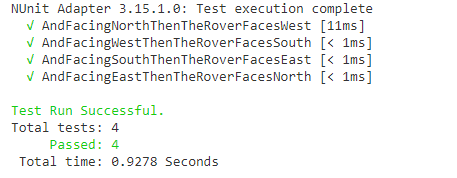
Already we can see how easy it would be to extend this test suite if a new Direction were to be added by adding the new TestCase and updating the other ones as needed.
Goodness, just like that we have a Rover that knows how to MoveForward, MoveBackward, and TurnLeft! In this post, we added some new functionality to Rover by first examining the requirements and implementing them one at a time. From there, we noticed during our refactor step that our test code looked similar, just differing on inputs. This, in turn, inspired us to look at parameterized testing which allowed us to drastically reduce the amount of code needed for the various use cases and allows us to add additional cases easier in the future. In the next post, we start taking a look at some interesting patterns that Rover is exhibiting in its three methods.
Welcome to the sixth installment of Learning Through Example – Mars Rover! In this post, we’ll pick up from where we left off with Rover and start implementing the rules for the Rover to move backward!
Just like last time, we’ll first examine what it means for the Rover to move backward by looking over the requirements in deeper detail. Once we have a better understanding, we’ll start driving out the functionality by focusing on a simple case and building more complexity. By the end of this post, we’ll have a Rover that will know how to move backward when facing any Direction!
If we look back at the original requirements for moving backward, we find this single line with regards to moving backward
When the rover is told to move backward, then it will move rover unit away from the direction it’s facing
Hmm, based on our previous experience with implementing MoveForward, I have a good idea of the requirements and after double-checking with our Subject Matter Expert, we confirm that our assumption is correct and derive the following requirements.
Given the Rover is facing North, when it moves forward, then its Y value decreases by 1
Given the Rover is facing South, when it moves forward, then its Y value increases by 1
Given the Rover is facing East, when it moves forward, then its X value decreases by 1
Given the Rover is facing East, when it moves forward, then its X value increases by 1
Great, we have enough information to get started so we can start demonstrating the software and get quicker feedback!
Not too shabby, we’ve got enough code in place to make everything pass so let’s take a look at refactoring. From the business rules, MoveBackward is too simple to need a refactor, though I have a suspicion about what the final look of the method will look like. From the test code, the test is pretty straightforward and looks a ton like the tests we wrote for MoveForward.
With all of that in mind, let’s go ahead and commit these changes and go to the next requirement!
Once again, now that we have passing tests, is there anything we want to refactor? The business rules look to be simple enough so I don’t feel the need to refactor those. When we look at the test code, the test seems straightforward and I’m not sure what I’d simplify.
Time to commit these changes and on to the next requirement.
With everything passing again, we can pause to rethink about refactoring but so far so good from my perspective. There are maybe some superficial changes that could be made, but I can’t make a strong enough argument to implement them.
Overall, Rover is looking to be in a good spot, however, one thing that stands out is that MoveForward and MoveBackward look similar due to their matching if statements. When I see duplication like this, I start thinking about how possible refactoring techniques to reduce the duplication. However, it can be tough to see a pattern before it establishes.
When it comes to refactoring to a pattern, I like to have three or more examples so I have a better idea of what use cases need to be supported. A common mistake I see developers make is that they start implementing a pattern before really understanding the problem. My approach is to refactor to a pattern when it makes sense and not before.
Circling back to this duplicated ifs, I’ve got a hunch that TurnLeft and TurnRight will follow a similar approach but I’m curious to know what they’re going to look like and I don’t want to refactor too early. So taking my own advice, I’m going to go ahead and skip refactoring MoveForward and MoveBackward until I at implement TurnLeft as that may change my approach.
Just like that, we now have a Rover that knows how to both MoveForward and MoveBackward! Like before, we first started by examining the requirements and coming up with our various test cases. From there, we were able to drive out the functionality by using red-green-refactor and building our software with tests. In the next post, we’ll take a look at implementing the logic for turning left!
Welcome to the fifth installment of Learning Through Example – Mars Rover! In this post, we’ll pick up from where we left on with Rover and start digging into how to make it move forward! We’ll first examine what it means for the Rover to move forward by looking over the requirements in deeper detail. Once we have a better understanding, we’ll start driving out the functionality by focusing on a simple case and building more complexity. By the end of this post, we’ll have a Rover that will know how to move forward when facing any Direction!
If we look back at the original requirements for moving forward, we find this single line with regards to moving forward
When the rover is told to move forward, then it will move one rover unit in the direction it’s facing
Super helpful, right? I don’t know about you, but this not nearly enough information for us to start our work because I’m not sure what that actually means!
In this case, we will have a more in-depth conversation with our Subject Matter Expert and we’ll find out that depending on the Orientation of the Rover the Rover‘s Location will change. Through additional conversations, we end up figuring out some more concrete business rules for when the Rover moves forward.
Given the Rover is facing North, when it moves forward, then its Y value increases by 1
Given the Rover is facing South, when it moves forward, then its Y value decreases by 1
Given the Rover is facing East, when it moves forward, then its X value increases by 1
Given the Rover is facing East, when it moves forward, then its X value decreases by 1
Great, we have enough information to get started so we can start demonstrating the software and get quicker feedback!
Let’s begin writing our first test for the Rover moving forward! We’ll be leveraging the same naming guidelines mentioned in part three to help make the use cases standout in our tests
So far, so good! The test matches the intent behind the name and a new developer can see that we’ve created a Rover facing North, called its MoveForward method and making sure that the Y property is 1.
If we try running the test, it will fail because Rover doesn’t have a MoveForward method, so let’s go ahead and write a simple implementation.
The error is caused due to the interaction of struct and the Location property implementation. If you recall, structs are value types which means when you assign them to a variable, the variable has its own copy of the struct, not the reference.
// Let's create a locationvarlocation=newCoordinate{X=0,Y=0};// And now let's have newLocation have the same value, NOTE: This isn't a reference to location!varnewLocation=location;// And if we check if both are equal, they are!Console.WriteLine(location.Equals(newLocation));// True// Now let's change location's X valuelocation.X=200;// That works just fine, but if we check what newLocation is, we see that it's stil (0, 0)Console.WriteLine($"newLocation = ({newLocation.X}, {newLocation.Y})");// Which means when we compare, they're not the same!Console.WriteLine(location.Equals(newLocation));// False
So what does that have to do with the Location property? Well, we’ve defined it as an auto-property which is syntactic sugar for telling the compiler to generate a backing field for the property and to implement default get and set logic.
// Given this definition of RoverpublicclassRover{publicCoordinateLocation{get;set}}// This is syntactic sugar for the followingpublicclassRover{privateCoordinate_location;publicCoordinateLocation{get=>_location;set=>_location=value;}}
So the problem arises from how get is working. It’s returning the backing field which is going to be stored as a variable for use. Recall from above that when we do that type of assignment, we’re working on a copy of the value. So if we try to make changes to the copy, the changes won’t make it back to the backing field which in turn won’t ever update the Location property!
So good job on the compiler letting us know that there’s a problem even if the message is a bit obscure! But how do we fix the problem? Well, to get the code to compile, instead of updating the Y property of Location, let’s go ahead and update the entire Location property instead.
For those keeping track at home, we’re doing a pretty good job of following Test Drive Development (TDD) principles in that we first wrote a failing test, then wrote enough code to make it pass. The third step is to refactor our code (both production and test) to make it easier to work with or to make it more robust.
If we take a look at the MoveForward method, it’s pretty simple and there’s not much we can refactor there for now.
Looking at this code, one thing that stands out is that we’re checking that Y got updated, but we’re not verifying that X nor the Orientation didn’t change. In fact, if we change the implementation of MoveForward to set the X value to be 200 and change the Orientation to be South, the test would still pass and it clearly shouldn’t!
Thankfully, we can mediate this oversight by creating an expectedLocation which will have the expected X and Y values for the Rover. In addition, we’ll update one Assert to use this new value and add another Assert to verify the Orientation
Nice! We’re now much more explicit about our expectations of Rover should be at this exactLocation and should have this exactOrientation, otherwise, fail the test.
While looking at this test, there’s one more subtle issue with code, can you spot it?
We’re making an assumption about what the initial Location for the Rover! What if the Rover started off at (5, 5) instead of (0, 0)? This test would fail, but not for the right reason (an error in the production code), but due to fragility in the way the test was written.
If we wanted to harden this test, we have two approaches
We could change our Arrange step to explicitly set the initial location of Rover to be (0, 0). This would guarantee the initial setup and if the default Location were to ever change, our test would still pass.
When we look at this test and the code we’re testing, the key thing that we’re wanting to test is that the right value was modified correctly (in this case either by +1 or -1). Given that, we could update our Arrange step to capture what the initial Location was and then update our Assert step to know about the location.
Now that we have a passing test for Rover and moving forward, let’s go ahead and implement another piece of functionality by writing a test for when the Rover is facing South
Now that we have a passing test suite again, is there anything we want to refactor? Are there any patterns starting to emerge?
From the business code, MoveForward seems pretty straightforward and I’m not sure what refactor I could do there that would make a lot of sense right now.
If we take a look at the test code, I’m noticing that our two tests so far look almost like carbon copies of each other. In fact, if we take a closer look, it seems like the only differences between the two tests are the Rover‘s Orientation and the expectedLocation. I’m really tempted to refactor this code to be a bit more DRY and remove some duplication. However, I’ve only seen two examples so far and before I refactor to a pattern, I actually want the pattern to manifest first so I know what the pattern is.
Let’s keep writing some more tests and see what pattern emerges!
If we look at the production code, I’m getting really tired of having to write Location = new Coordinate {X=Location.X..., Y=Location.Y...} because I know I’m going to have to write this similar logic for the last remaining test for moving forward and probably something similar for moving backward.
Looking at the way we’ve been modifying Coordinate, it seems like we’re every modifying X or Y by a set amount, so what if we wrote some methods that could adjust either X or Y?
If we take a look at Coordinate, it seems like we have a struct with the two properties in mention, so let’s add a method called AdjustXBy that will return a new Coordinate with X adjusted by that value and keep Y the same
Even in this small example, this addition is already more concise of our intent than the other two cases. After doing a quick verification that the test still passes (otherwise the refactor isn’t a refactor), let’s go ahead and add a new method to Coordinate called AdjustYBy that is similar to AdjustXBy
After making that much change to the production code, we’ll go ahead and run our test suite again and it seems like the change is working as expected, nice!
Now that we’ve refactored the business rules and our test suite is passing correctly, we can take a look at refactoring our test code. With the addition of the East test, the tests are definitely following a pattern and I should be able to extract out that logic to a single test and then pass in different parameters (even though the link is to NUnit, most test frameworks support this concept).
Given the differences between the tests, we would need to extract the starting Direction and the expectedLocation to be parameters. However, the expectedLocation is based on the initialLocation which is currently based on whatever the Rover defaults to.
Based on that chain, if we wanted to do this refactor, we would have to pass in a Rover as the parameter and I really don’t like that idea because if Rover grows to be bigger, then creating a Rover becomes more involved and I don’t want to inflict that onto my test. In addition, one thing that is nice about our tests is that they’re easy to read and to follow their logic which has a ton of value given that developers spend more time reading code than writing code.
All of that to say, that even though the tests look similar, I’m going to pass on refactoring to a single unified test because I’d be trading readability for removing duplication and these tests are small enough that I don’t think it’s that much technical debt to take on.
With the latest test, we’re 3/4 of the way through implementing MoveForward, so let’s go ahead and write another failing test for when the Rover faces West.
And with this latest addition, not only do we have a passing test suite, but we’ve also covered the business rules for when the Rover moves forward, completing this part of the kata, nice!
As a recap, here’s what Rover and WhenMovingForward looks like
With this final test in place, we have the core functionality for when the Rover moves forward. In addition, we’ve written enough tests and functionality now that if requirements were to change, we have a pretty good guess on what the work involved would be. In the next part of the kata, we’ll start implementing a new piece of functionality!
In this installment of the Mars Rover kata, we’re going to start implementing the Rover type! First, we’re going to review the models that we derived in Part 2 of the series. From there, we’ll take a look at the various requirements and see which piece to start implementing. From there, we’ll write our first tests, driving the new functionality and running into a snag or two on the way. By the end of this post, we’ll be one requirement down for the kata and have a better understanding of the Rover type!
As a recap, we’ve derived the following models and implementations for the kata so far. For this post, we’re going to be spending the majority of our time working with Rover, but it’s good to know what our base looks like.
When I begin a new feature, one thing that I’m always thinking about is how do I break down the work ahead of me in such a way that I can start delivering value much faster. This doesn’t mean that I’m skipping on quality, but it does mean that I value quicker feedback than 100% test coverage. With that being said, when I look at the requirements, something that I can implement pretty quickly is that when the Rover starts, it should be at (0, 0) facing North.
Like everything in development, there are multiple ways we could implement this functionality
Provide a default constructor for Rover that sets those values explicitly
Update the Program.cs file to set those values for Rover
With the first approach, we’re encoding this business rule into the Rover type and forcing that when anyone creates an instance of Rover, it will always be at (0, 0) facing North which is a nice way of putting the business rule into the right component.
With the second approach, we’re going to let Rover be a dumb component and have some other component decide these values. The downside to this approach is that if there’s an error with Rover, we won’t know if it’s because of how Rover is behaving or how it was created.
Both approaches are valid, so I’m just going to pick one and use that for now. If later down the road we need to make a change, we’ll update as needed. With that being said, I’m leaning towards the first approach, so let’s go ahead and write our first unit test on making sure that Rover is facing North.
We don’t have any constructors defined nor are we setting values for the two properties, so how does it know that Orientation is North?
Magic?
Not quite! Since we’re not setting any value for Orientation, it will be whatever the default value for Direction is. We can determine that by using the default operator in C#.
So what’s happening here is that when the Rover is created, it looks for any logic in the default constructor. Since there isn’t one, it will set default values to both properties. For Orientation, that value will be 0 and by default, it will be the first value listed in the Direction enum.
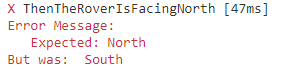
So for fun, if we change North to be the second choice in Direction
Failing unit test for Mars Rover as the expected value was North, but the value was South.
I don’t know about you, but someone changing the ordering of an enum shouldn’t be causing a failing test. Luckily, resolving this issue is as simple as explicitly stating the Orientation in Rover‘s default constructor.
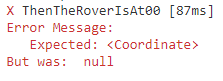
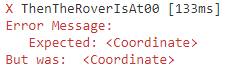
[Test]publicvoidThenTheRoverIsAt00(){// Arrange and Actvarrover=newRover();varexpectedLocation=newCoordinate{X=0,Y=0};Assert.AreEqual(expectedLocation,rover.Location);}
When we run the test, we get the following error:
Failed test for Rover since it was expecting a Coordinate, but the Location was null.
Ah, yeah, that makes sense, Location is a Coordinate which is an object. Because we’ve not explicitly set Location, the default value is null.
publicclassRover{publicDirectionOrientation{get;set;}publicCoordinateLocation{get;set;}publicRover(){Orientation=Direction.North;Location=newCoordinate(){X=0,Y=0};}}````Solet’sre-runourtestnow.```csharp[Test]publicvoidThenTheRoverIsAt00(){// Arrange and Actvarrover=newRover();varexpectedLocation=newCoordinate{X=0,Y=0};Assert.AreEqual(expectedLocation,rover.Location);}
Failed unit test since the expected coordinate is not the same as the actual coordinate..
When we leverage Assert.AreEqual, under the hood, it’s leveraging the built-in Equals method for the values being passed in. For primitive types, this will do a comparison by values, but if we’re comparing objects, then it will do comparison by reference.
Given this, the problem we’re running into now is that even though I have two Coordinates that have the same value, since they are two different objects, then Assert.AreEqual will fail. We’ve got a couple of different ways to solve this problem.
One way to solve the problem is by overriding the Equals method on the Coordinate class and override the logic so that two Coordinates are the same if all of their properties are the same. This is a pretty solid approach to take if that’s how equality should work everywhere. With that being said, here are some things to keep in mind when using this technique.
First, if the class gains a new property, you will need to remember to update the Equals method, otherwise, you’ll get interesting behavior when two objects that have a single difference are being treated as the same.
Next, if you override Equals, then you must override GetHashCode as well. If you fail to do this, this will generate a warning during compilation time, but the bigger problem is that for two objects that are the same based on the definition of Equals but hash differently, then you will fail to find the item correctly in Dictionary and HashSet structures. When implementing GetHashCode, you should use the same properties for hashing as you would for equality checking.
Overall, I will use this approach if equality for this type needs to be by value for everywhere in the application but this isn’t my favorite approach because developers need to remember to update both Equals and GetHashCode when new properties are added.
The second approach we can take to have equality by value is by changing our type for Coordinate from a class to a struct. The cool thing about structs is that they by default handle equality by value so if you do need to add another property, things will work as expected. However, like all things in software, there are a couple of things to be aware of.
First, structs have to have an empty, default constructor. So if there are some validation rules that need to be checked in the constructor, there’s no way to force that to happen. Another effect of this drawback is that if a struct needs two things to exist or it shouldn’t be created, you can’t force callers to pass them in which can play havoc with making illegal states unrepresentable.
Second, when working with structs, and you change one of the properties, you’re modifying a copy of the struct and not the original version.
publicstructDate{publicintMonth{get;set;}publicintDay{get;set;}publicintYear{get;set;}}publicclassOrder{publicDateTransactionDate{get;set;}publicdecimalTotal{get;set;}}varorder=newOrder{Total=9.99m};// at this point, Order will have a Date of 0/00/0000order.TransactionDate=newDate{Month=6,Day=22,Year=2020};// Order has a new date!order.TransactionDate.Day=23// Fail to compile => Cannot modify the return value of `TransactionDate`// because it is not a variable
It’s not a problem if you replace the whole struct value, but if you only want to change a part of it, you’ll need to replace the whole value. If you’ve ever worked with the DateTime type, you’ll notice that you can’t change values, but you can create a new DateTime value with updated properties.
Overall, I prefer this approach when modeling values where dependencies aren’t required and there’s not a need for validation logic.
The third approach you can take when checking if things are equal is by defining a custom Equals method that lives in my test suite and is only used for testing. The benefit of this approach is that I can now verify my objects by value, without the need of overriding two different methods. In addition, since this type of equality is only needed for testing, I can now have this logic live in the test project. In addition, I can still have validation logic and non-default constructors for my classes.
The main downside to this approach is that if there’s a new property added to the class that you’ve written custom equality logic for, you’ll need to update this method as well.
Overall, I prefer this approach when I need equality by value for testing purposes only and I don’t want to make wide-sweeping changes by changing my type from class to struct.
Now that we have some more information about why the test failed and a few different approaches, let’s take a look at what approach makes sense here. First off, Coordinates really don’t have any validation logic. Second, in our system, if we have two Coordinates with the same values, then they should be considered the same. Given these assumptions, I’m going to go ahead and change the type definition from class to struct.
In this post, we started writing tests on Rover. We started off by adding a default constructor which sets the Orientation to Direction.North and explored about how setting defaults explicitly can protect us from changes in the future. From there, we wrote a test on Location and learned about how Assert.AreEquals leverages default equality and a few different approaches to solving this problem. Now that we have a way to assert against Orientation and Location, we can start writing tests for when the rover moves forward!
The goal of this post isn’t to try to convince you that you should be unit testing your code, but to give you enough information that if you need to unit test your code or if you’re in a codebase that expects tests, you will have the knowledge to hold your own. If you are looking for reasons why you should be testing, there are some great resources in the Additional Resources section at the end of the post!
At its core, unit testing is the practice of writing code that tests that your code is working correctly. Confused? It’ll make sense in a minute, I promise! If you’ve ever made changes to a project, how confident were you that your changes worked? If I had to guess, there’s a high level of confidence that your changes solved the problem. However, how confident were you that your changes didn’t break some other piece of functionality? I imagine that your confidence is a bit lower. For me, I’m reasonably confident that my changes are solid, but I’m not always sure that I didn’t break some other features elsewhere. The most straightforward approach to verify everything is working correctly is to run the application and try it out, right?
For small applications, that’s a pretty reasonable approach to take and wouldn’t take too much time. However, what if you’re working on a more complicated application? How much time is it taking for you to compile the application, launch it, and start navigating through the UI? The premise of unit testing is that we can exercise the same logic that’s running in the application but without having to go through the interface. This type of testing is generally faster and less error-prone since your test code will do the same tests over and over again. The downside is that you’ll spend more time writing code, but for me, I feel much more confident in my work when I can run the full test suite and know pretty quickly if I’ve broken something.
If you’ve been following along with the Mars Rover kata series then you know I’m a huge fan of using the same language as my Subject Matter Experts (SMEs) when it comes to the problem at hand as it prevents confusion when different terminology is used for the same concept.
When it comes to naming my tests, I take this approach one step further and name my tests in such a manner that if you read the class name followed by the method, then you’ll have a clear idea of what the test’s intent is. The main reason I name my tests this way is that if my test fails, I want to know what requirement or workflow is not working so I can see if it makes sense for that workflow to be impacted.
Sometimes, a test will start to fail because requirements have changed, so the test needs to be updated or removed. In other cases, the test failure reveals a contradiction in rules so it helps me if I can clearly see the use case and ask the right questions to my SMEs.
When it comes to naming my test classes and method, I borrow inspiration from the Given/When/Then naming methodology. I came across this convention when learning about Behavior Driven Development (BDD) early on in my career but I was familiar with the naming convent from working with user stories. The intent of Given/When/Then is that it provides the context, an action, and a result. Going to Mars Rover, an example user story would be
Given that the rover is at (0, 0) facing North, when it receives the move forward command, then it should be at (0, 1) facing North
Let’s break this user story down and examine the various parts:
The Given portion of the user story sets up the context of the application. It can be as simple as Given that the user is logged into the system or as complex as Given that today is a holiday and that a user wants to make a reservation. The goal here is that someone can read this portion of the story and understand what is being accomplished. For this user story, the context is that we have a Rover that’s located at (0, 0) facing North.
The When portion of the user story gives what action is being taken in the application. At this level, we’d typically stay away from technical jargon (i.e. the user clicks the reservation button) and focus more on the workflow being accomplished. For this user story, the action is that the Rover received the Move Forward command.
The Then portion of the user story tells us what the expected result or behavior is. It can be as simple as then the total is $42.55 or as complex as then the sale is declined and the user is informed that there was an issue processing the payment. For this user story, we’re expecting that after the Rover receives the Move Forward command, then the rover is at (0, 1) facing North.
Now that we’ve learned a bit more about Given/When/Then, let’s talk about how this can influence your test structure. When I’m writing tests, I’ll typically place them in a unit test project that’s separate from production code so that we don’t deploy the unit tests with the production code.
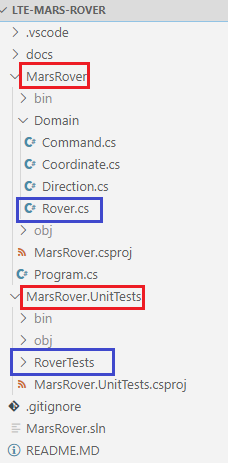
In the case of Mars Rover, if I have a project called MarsRover, then I’d have a project called MarsRover.UnitTests. Once I have this new project created, I’ll create a folder called xyzTests where xyz is the name of the class I’m writing tests against. So if I’m writing tests against the Rover class in the MarsRover project, then I would have a folder called RoverTests in the MarsRover.UnitTests project.
Project naming conventions outlined in red. The test class and folder naming conventions outlined in blue
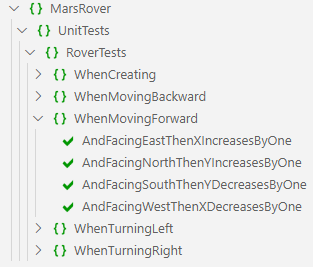
From here, I’ll generally create a file per method or workflow that I want to test for the class. So based on our user story above, I would have a file called WhenMovingForward and this file will contain all the different tests for this functionality. Once a file is in place, we can start writing the various test methods for different behaviors. When naming methods, I will include the context for the setup and what the expectations were. By combining the test name and the method name, it will sound like a user story.
VS Code Test Runner showing test classes with test names
At this point, we have the infrastructure in place for our tests, so how do we write a good test? Every good test will have three parts, Arrange, Act, and Assert. In the Arrange step, we’re going to focus on creating dependencies and getting the initial state setup for the test. For simple tests, this step may only consist of creating the class that we’re testing. For more complicated tests, there may be more dependencies to create, some methods to call, and possibly modifying the local environment. The Act step is where the method or property that we’re testing is called. This step should be the simplest portion of the test since it should only be a line or two of code. The third and final step is the Assert step where we check that the result we observed was correct. For simple tests, this could be a single line where check a value whereas more complicated tests may need to check various properties.
Using WhenMovingForward as an example, here’s what an example test might look like.
I like to think of Arrange/Act/Assert (AAA) as a science experiment because we have to first find a hypothesis, design some test to prove or disprove the hypothesis, get all the necessary ingredients together for the test, run the test, and see if we have evidence to support our hypothesis.
In this post, we took a brief break from the Mars Rover kata to get a quick understanding of unit testing and the naming conventions we’ll be leveraging for the rest of the series! We first talked about the importance of naming and how if we follow Given, When, Then syntax, we can turn our user stories into readable test names for future engineers. From there, I showed you Arrange, Act, Assert notation for tests, and an example test using the convention. Next time, we’ll start implementing Rover!
In this installment, we’ll be looking at the problem description for Mars Rover. After becoming more familiar with the problem, we’ll start by identifying the terminology that we should be using when talking about the problem by defining a ubiquitous language. From there, I’ll show you how to break down the problem into various concepts and how to find the relationships between the various pieces. By the end of this post, you should feel comfortable exploring a new domain, understanding the terminology used, and defining relationships.
Congratulations and welcome to the S.P.A.C.E¹ Institute, good to have you aboard! Our big focus for the year is to develop a rover that can navigate the surface of Mars! While the engineers are working on the design and building of the rover, we can focus on building the navigation module and start iterating on its design. With that in mind, here are a couple of assumptions we’re going to make for this version.
The rover will be traveling on a two-dimensional plane that should be modeled as a coordinate (X, Y)
The rover is guaranteed to be able to travel in a chosen direction (no worries about obstacles or other landmarks)
Given the above assumptions, here are the business rules that the emulation will need to follow
When the emulation starts, the rover will always be at (0, 0) and facing North
There are a series of commands that the rover can receive that can change its location or direction
When the rover is told to move forward, then it will move one rover unit in the direction it’s facing
When the rover is told to move backward, then it will move rover unit away from the direction it’s facing
When the rover is told to turn left, it will rotate 90 degrees to the left, but not change its location
When the rover is told to turn right, it will rotate 90 degrees to the right, but not change its location
When the emulation is told to quit, the rover will stop receiving commands
For the emulation, valid directions include North, East, South, and West
In order to help troubleshoot failures with the emulation, every time a command is received, both the command received, the rover’s location, and the rover’s orientation should be logged.
When building software, I want to understand the various business terms that are being used to describe the problem so that when I’m talking to subject matter experts (SMEs), I’m using the same terminology as they are. For those who are familiar with Domain-Driven Design, this practice of using the same terminology is known as defining a ubiquitous language and the goal is to make sure that when someone says Command, then we are all referring to the same concept. If you’ve ever worked in a codebase where something was called one thing, but the business referred to it as something different, then you are familiar with the pain of having to map between the two concepts.
When working to define the ubiquitous language, a common approach is to find the nouns that are being used in the description as this can create the foundation of your classes (if following Object-Oriented principles) or your types (if following Functional Programming principles).
Looking over the description again, these nouns stood out to me:
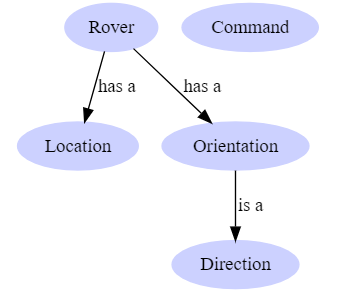
Domain models: Rover, Command, Location, Direction, and Orientation
Once the nouns have been found, I’ll pivot to finding out how these different concepts are related to each other. One approach to finding these relationships is using “has-a” and “is-a” relationships. At a high level, if two things are related through “has-a”, then those concepts should be composed together. If two concepts have an “is-a” relationship, then I know that the concepts should be interchangeable for one another.
To help identify these relationships, I would work with the SME to understand what each of these concepts means and how they relate to each other. Since it’ll be a bit hard to simulate a conversation, here’s the information that we would learn from our SME.
A Rover has a Location and an Orientation
Orientation is the Direction that a Rover is facing
Location is the coordinates that the Rover is located at
A Command is something that a Rover receives from the User
A Direction can be North, East, South, or West
A Command can be Move Forward, Move Backward, Turn Left, Turn Right, or Quit
With this new understanding, our concepts and relationships would look something like this:
Domain model relationships where Rover has a Location and an Orientation. Orientation is a Direction and Command is not related to anything.
In this post, we explored the problem description for the Mars Rover kata and built up our understanding of the various concepts by exploring the nouns. After finding the nouns, we leveraged “has-a” and “is-a” thinking to come up with a rough idea of how the various concepts related to one another. In the next post, we’ll be focusing on how to model these concepts in code!
Over my career, I’ve spent a lot of time bringing new engineers up to speed on how to break down problems, how to write better code, and how to write automated tests. What I’ve come to find out is that there are a ton of resources on how to do each of these things individually, but not very many that brings all of these concepts together in one place. The purpose of this series is to bring all of these ideas together as we solve the Mars Rover kata.
For new engineers, this kata has about the right amount of complexity to explore these various concepts and help identify things to improve on. As a team lead at SentryOne, I’ve onboard interns and our associate engineers using this kata as a launch point to teach them the tooling and processes we use. In addition, this kata serves as a method to evaluate their current skills so we can help round out a solid foundation for their career.
By the end of this series, you will have a better understanding of how to break down a problem into small, deliverable pieces while being able to write tests around new functionality. Even though there will be a lot of code to look at, none of these concepts are technology-specific so I challenge you to follow along with your tech stack of choice and see how you would implement some of these concepts in that stack.
On the topic of technologies, I’ll be using the following for my implementation of this kata. As long as you find the relevant tool for your technology stack, you should be able to follow along!