Functional Design Patterns - Missing Values
When working in software, a common problem that we run into is what should we do if we can't get a value or compute an answer.
For example, let's say that you go to the library to checkout the latest book from Nathalia Holt, but when you search for it, you realize that they don't have any copies in stock.
How do you handle the absence of value? From an Object Oriented Programming (OOP), you might be able to leverage a reasonable default or the Null Object Pattern. Another approach would be to return to always return a list and if there are no values, then the list would be empty.
No matter the choice you make, we need some way to model the lack of a value. Tony Hoare referred to null as his billion dollar mistake as its inclusion in languages have created countless bugs and errors.
In most functional languages, the idea of null doesn't exist, so how do they handle missing values?
Revisiting Functions
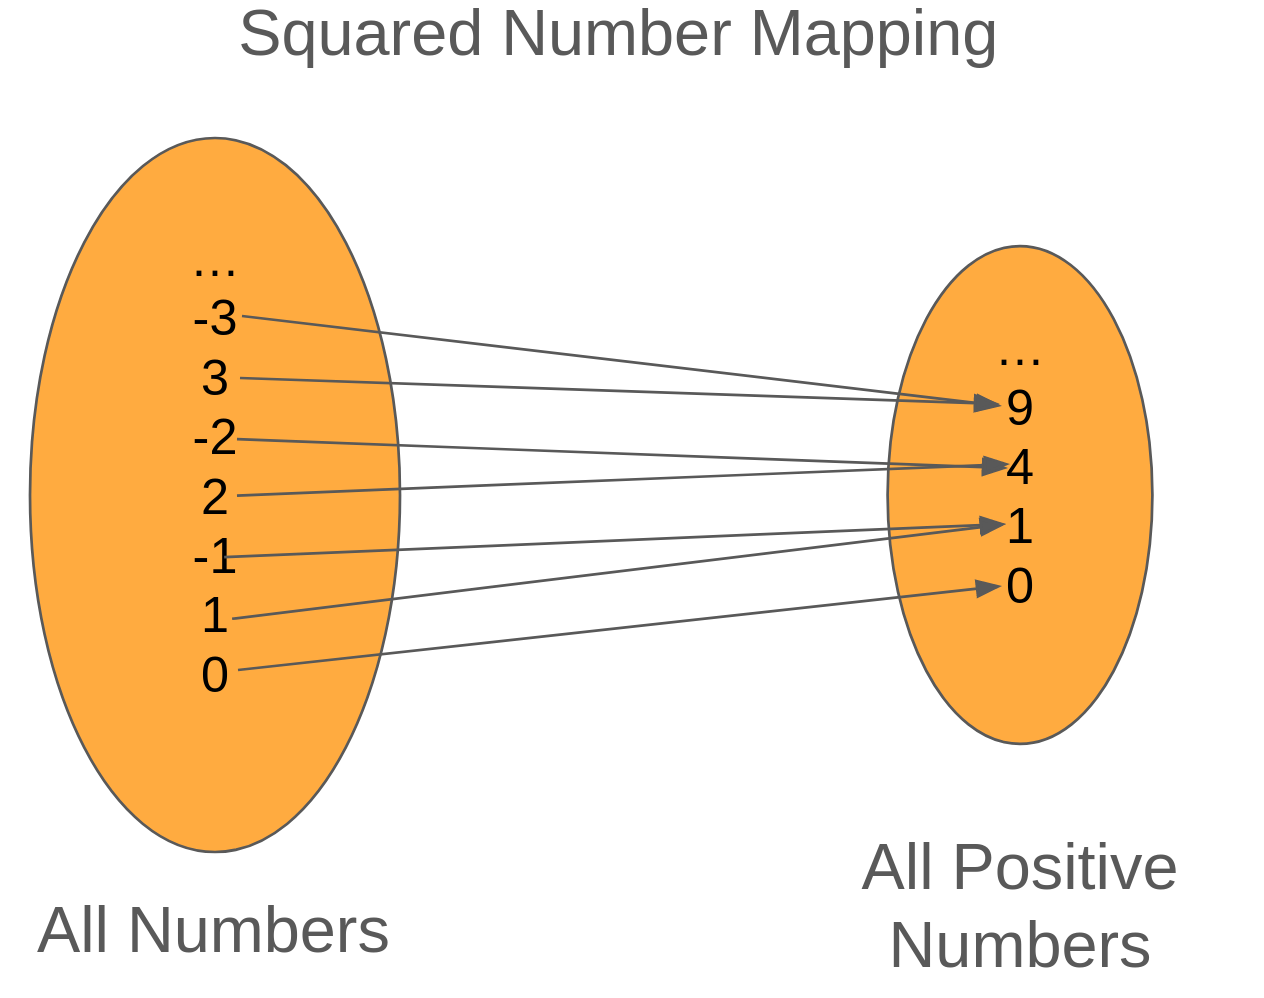
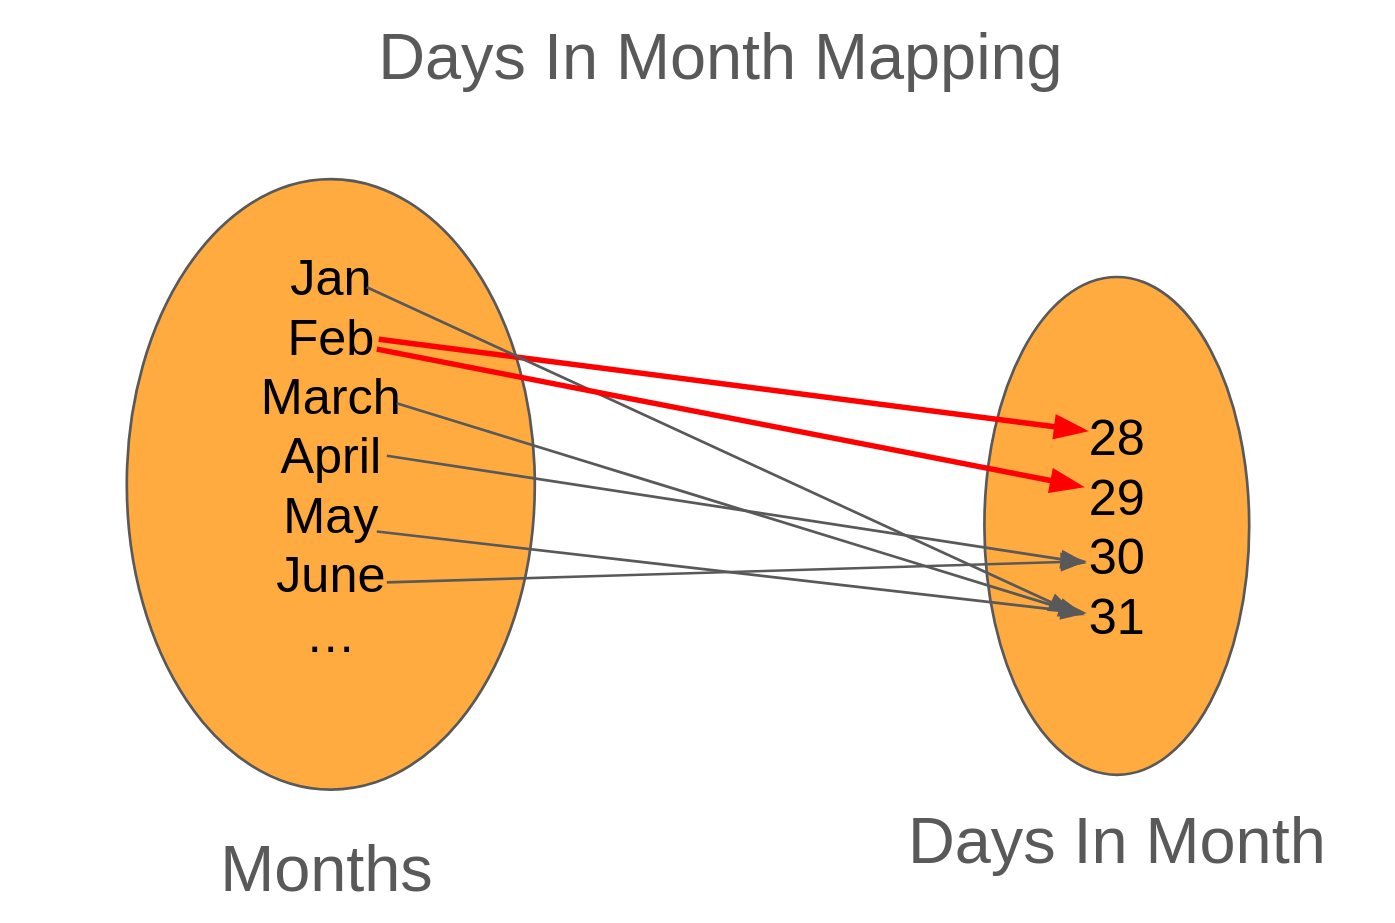
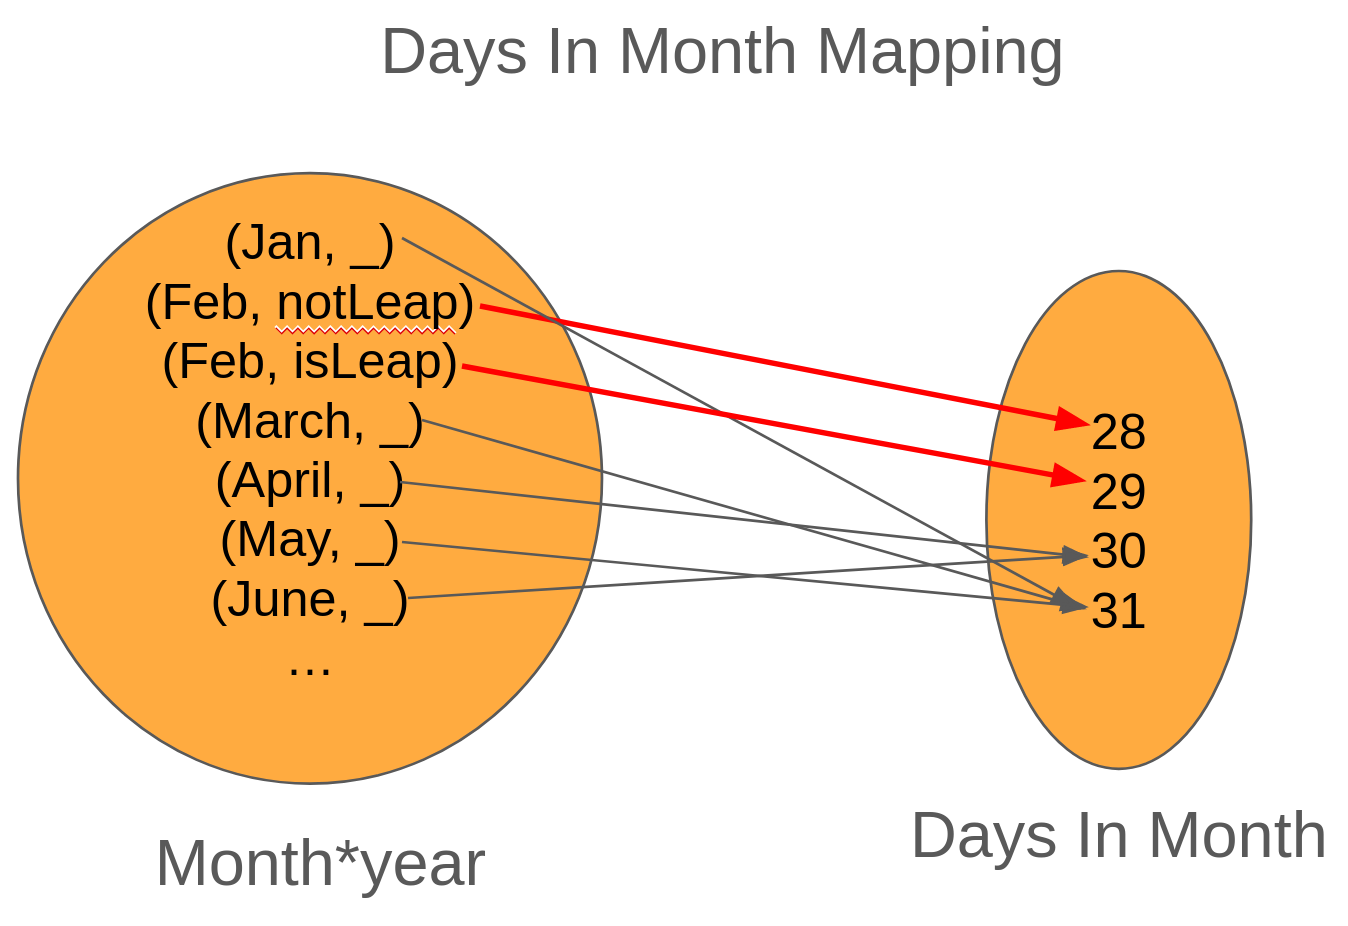
In a previous post, we mention that a function is a mapping between two sets such that every element on the left (first set) is mapped to a single element on the right (the second set). So what happens when we have a mapping that's not a function?
In these cases, we have two solutions to choose from:
- Restrict the function input to only be values that can be mapped (e.g., restrict the domain)
- Expand the possible values that the function can map to (e.g., expand the range)
When refactoring a mapping, I tend to stick with option 1 because if we can prevent bad data from being created or passed in, that's less error handling that needs to be written and it becomes simpler to reason about. However, there are plenty of times where our type system (or business rules) can't enforce the valid inputs.
Number Math
Let's say that we're working on a "word calculator" where the user can enter a phrase like "one thousand twelve" and it returns "1012" as output. If we think about our input set (domain) and outputs, we would have the following (mapping from string to number).
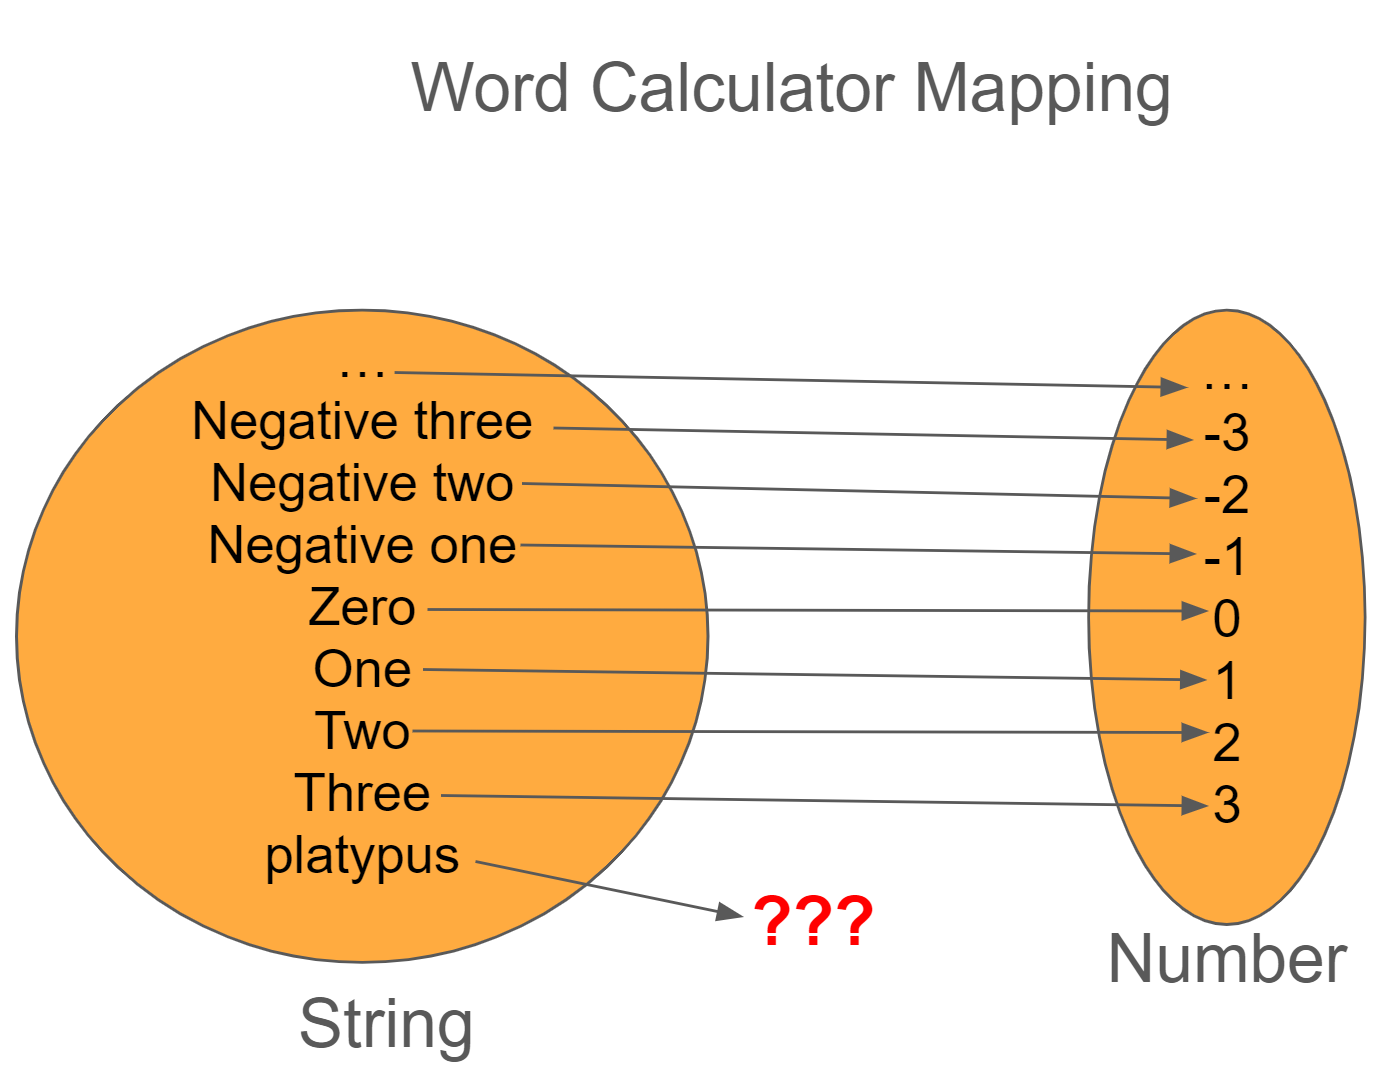
The issue is that we can't guarantee that the strings the user gives us would represent a number (for example, how would you convert "platypus" to a number?)
Since we can't restrict the input, we have to expand the output. So let's update our output to be number | 'invalid'

With this change, anytime we call convertToNumber, we'll need to add some handling on what to do if the output is invalid.
Here's some pseudocode of what this mapping could look like
Leaky Context
So far, so good as we have a function that converts words to numbers. Let's now say that we want to square a number. Writing such a function is straightforward.
With both convertToNumber and square defined, let's try to combine these together:

This doesn't work because convertToNumber can return invalid which there's no way for the square function to work with that. Due to this limitation, we could rewrite the code to check for invalid before calling square.
This approach will work, but the downside is that we need to add error handling logic in our pipeline now. If this was the only place where it's being used, then it's not too bad. However, if we were using convertToNumber in multiple places, then we have to remember to add this error handling logic. In fact, we would have almost the same if check everywhere.
Let's take a look at a different way of solving this problem by using the Maybe type.
Introducing the Maybe Type
In our original approach, we already had a type called WordCalculatorResult for the computation. Instead of it being a number or invalid, we could instead create a new type, called Maybe that looks like the following:
By leveraging generics and tagged unions, we have a way to represent a missing value for any type. With this new definition, we can rewrite the convertToNumber function to use the Maybe type.
I don't know about you, but typing out {label:'some'} is going to get tiring, so let's create two helper functions, some and none that handle putting the right label if we have a value or not.
Which allows us to replace all of the {label:'some', value:x} with some(x) and {label:'none'} with none().
Now that convertToNumber returns a Maybe, our pipeline would look like the following:
Introducing Transformations With Map
Now the problem we're wanting to solve is to get rid of having to do an if check on some in order to call the square function. Given that we're wanting to transform our number into a different number, we can write another function, called map that takes two parameters: the Maybe we want transformed and the function that knows how to transform it. Let's take a look at how to write such a function.
With map implemented, let's update our code to use it!
Thanks to map and Maybe, we're able to write two pure functions (convertToNumber and square), glue them together, and delegate our error handling to one spot (instead of having to sprinkle this throughout the codebase).
Calling Side Affects Using Tee
With the addition of map, we've now simplified our if check to only call console.log now (instead of calling the square function then console.log). If we wanted to truly get rid of this if statement, then we need a way to invoke the console.log as a side effect. We don't want to combine console.log into square because square is business rules and we don't want to add side effect logic to our business rules.
Similar to what we did for map, let's add a new function, called tee, that takes in three arguments: a Maybe, a function to call if the Maybe has a value, and then a function to call if Maybe doesn't have a value.
Let's take a look at what an implementation would look like:
With tee implemented, we can update our pipeline to take advantage of it:
Cleaning Up by using an Object
We've now centralized the if logic to the functions that work on Maybes which is helpful, but as we're already seeing, the code can be hard to parse as you need to read from the outside in (which is very Clojure or Scheme in nature).
Instead of building up functions this way, we can instead create a TypeScript class and use a fluent interface pattern by doing the following:
Wrapping Up
When writing software, a common problem we run into is what to do when we can't calculate a value or a result. In this post, we looked at techniques to restrict the function's input or expand their output to handle scenarios. From there, we looked into a type called Maybe and how it can represent the absence of value, but still provide a way to remove having to explicitly write error handling code by consolidating the checks into a map call. Lastly, we look into taking the various functions that we wrote and combine them into a formal Maybe class that allows us to leverage a fluent interface and chain our interactions together.